Sam's Blog

26 Oct

The many properties of ProvideLanguageServiceAttribute

The ProvideLanguageServiceAttribute class has been with us for many years now. At least since it shipped as source code in the Visual Studio 2005 SDK. With more than two dozen properties, it’s easy to get lost trying to figure out which ones are meaningful and/or useful, and which ones are safe to ignore.

Continue Reading »

08 Oct

Testing strong names of NuGet-distributed assemblies

Assembly versioning for strong-named assemblies is a notoriously difficult topic, but once understood becomes straightforward to work with. In this post, I’ll cover two features I recently started incorporating into my projects to ensure the versioning rules for the project are properly observed prior to releasing packages.

  1. Distribution of Strong Name signing files (*.snk) in open source projects
  2. Validating the strong name of assemblies prior to publication

    Continue Reading »

19 Apr

File types and extensions in Visual Studio 2012

The Visual Studio 2010 SDK introduced the new class FileExtensionToContentTypeDefinition. This post is all about why I no longer use/export this class, and what I now do instead. The steps in this post only associate specific, known extension(s) with a content type. Further integration into the user-customizable File Types settings and Open With… features requires additional work described in my answer to this Stack Overflow question: Supporting user-specified file extensions in custom Visual Studio language service.

The following requirements led me away from this attribute.

  1. The Type & Member Dropdown Bars feature is not exposed through an MEF editor extension point. Supporting this feature requires providing an implementation of IVsCodeWindowManager (beyond the scope of this article).
  2. To provide an implementation of IVsCodeWindowManager, you must provide an implementation of IVsLanguageInfo.
  3. If you provide an implementation of IVsLanguageInfo, the GetFileExtensions and GetLanguageName methods of that interface will be used instead of the values given to FileExtensionToContentTypeDefinition.

To maximize your ability to support the full range of Visual Studio features in your extension, you can take the following steps to register your new language or file type.

1. In your VSPackage.resx file, add the following values.

  • 100 – Language name
  • 110 – Package name
  • 111 – Package description

2. Derive a package class from Package.

[PackageRegistration(UseManagedResourcesOnly = true)]
[InstalledProductRegistration("#110", "#111", "1.0")]
[Guid("your guid here")]
public class ExamplePackage : Package
{
}

3. Implement IVsLanguageInfo.

This is actually pretty simple.

4. Register the IVsLanguageInfo implementation

Register the IVsLanguageInfo implementation using the ProvideLanguageServiceAttribute and ProvideLanguageExtensionAttribute registration attributes. Override the Package.Initialize method to provide the implementation. Here is the updated ExamplePackage class.

5. Create and export a ContentTypeDefinition.

NOTE: Since we are not using a custom editor factory, the content type name used here must match the language name used as the 2nd argument to ProvideLanguageExtensionAttribute above.

21 Mar

A Java debugger for Visual Studio 2012 (and 2010)

Tunnel Vision Labs is currently working on extending the Java Language Support extension for Visual Studio to include a complete source-level debugger. If you are interested in testing an alpha build of this debugger, please contact Tunnel Vision Labs for more information.

In this post, I’ll talk a bit about the current state of the extension and the features currently supported by the debugger.

Current features of the debugger include:

  • Support for multiple JVMs
    • Support for the 32- and 64-bit releases of the standard JDK 6 and 7 (HotSpot VM)
    • Support for the 32- and 64-bit releases of JRockit R28.x
  • Full support for “Java Runtime Environment” exceptions in the Debug → Exceptions dialog
    • Standard packages and exceptions are shown in the Java Runtime Environment category
    • Users can add their own exceptions by name
    • Users may select which exceptions the debugger should break on at the time they are thrown
    • Unhandled exceptions automatically trigger a breakpoint
    • When an exception is thrown, a message is printed to the output window (similar to the way it’s handled in C# debugging)
  • Standard (unconditional) breakpoints
  • Stepping in the editor
    • Step Into/Over/Out
    • The Step Over command steps over a statement – with proper support for multiple statements on a single line
  • Disassembly window
    • Shows JVM bytecode interleaved with the original source code
    • The Step Over command steps by bytecode instruction instead of by statement
  • Support for the Locals, Autos, and Watch windows
  • Support for the Immediate window
  • Support for pinnable data tips
  • Support for the Threads window
  • Support for user-friendly representation of collections (lists, maps, arrays, etc.)

Stepping over statements

In our opinion, this is hands-down the coolest feature of our debugger.

Continue Reading »

07 Jan

GraphViz viewer for NetBeans

Today I’m releasing a small utility for quickly viewing GraphViz (DOT) files which I’ve used many times over the past year. The project source is hosted on GitHub.

Block.dot Visual

Overview

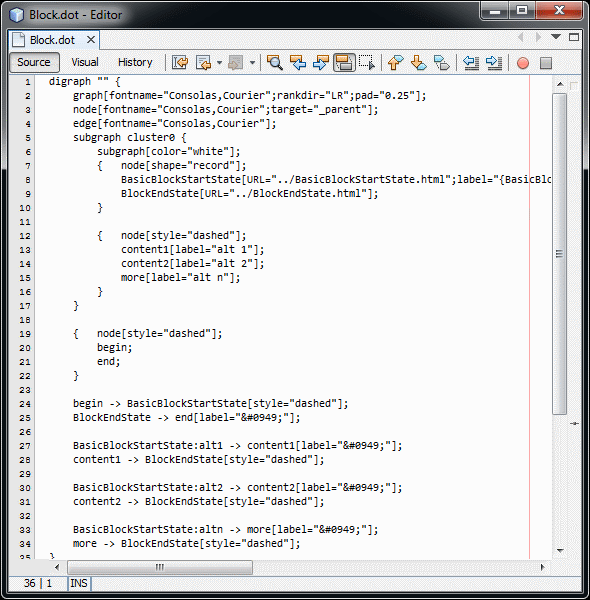
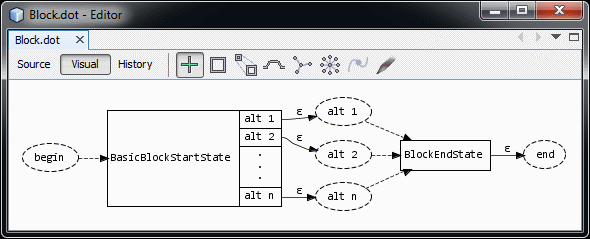
This extension integrates a modified version of the standalone ZGRViewer into the NetBeans IDE. When a GraphViz file (*.dot or *.gv) file is opened, a plain text editor is presented along with “Source” and “Visual” buttons on the document’s tool bar. When the document is saved, the plugin uses GraphViz to generate an SVG for the file which can be viewed by clicking the “Visual” button. Further changes to the graph may be made by switching back to the “Source” view. Note: if changes are made to the source file, the visual graph is only updated after the file is saved.

Here is an example from editing Block.dot in the ANTLR 4 runtime documentation. The “Visual” pane for this file is shown above.

Block.dot Source

Installation

Prerequisites

This extension requires the following to be installed separately.

Plugin

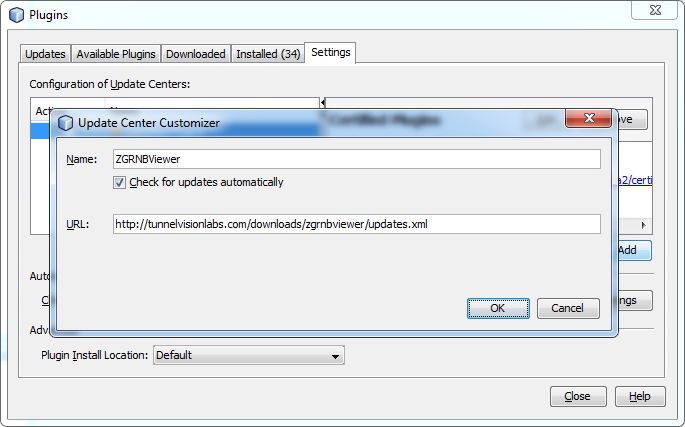
  1. Open the NetBeans plugin manager. On the Settings tab, click Add to add the following customizer:

ZGRNBViewer Update Center Customizer

  1. On the Available Plugins tab, you should now see an option to install the “ZGRViewer Integration” plugin. After accepting the license and installing the plugin, you should be ready to configure and use the viewer. šŸ™‚

ZGRNBViewer Integration

Configuration

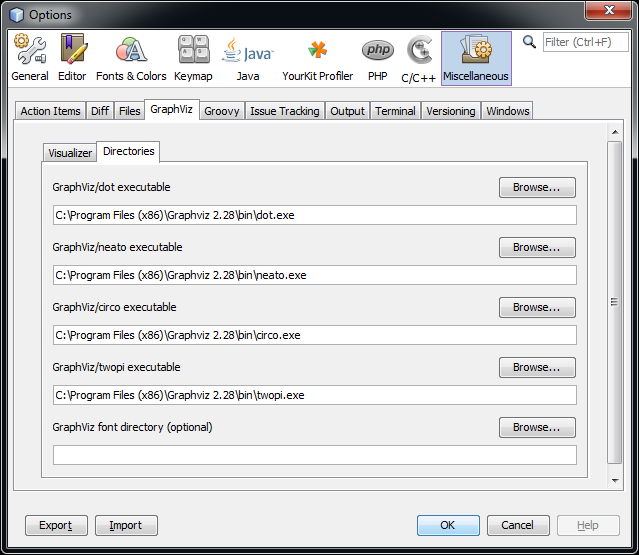
After installation, if the dot executable is not in your system path, you’ll need to configure the path to dot before using the plugin. In the editor options under the Miscellaneous section is a GraphViz tab. Here is an example configuration on the Directories tab:

ZGRNBViewer Directories

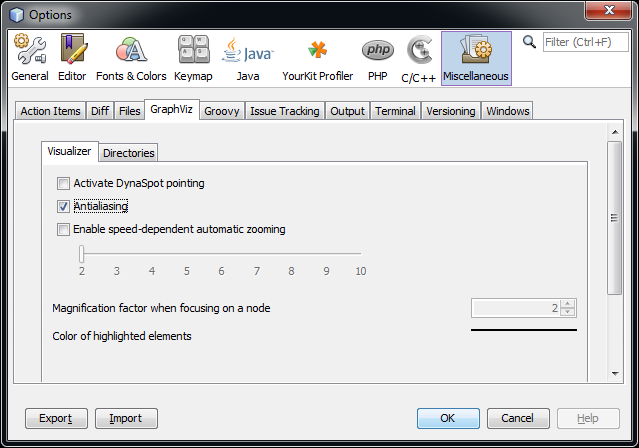
You may also wish to enable anti-aliasing on the Visualizer tab:

ZGRNBViewerOptions

01 Dec

Code Completion filtering, selection, and replacement algorithms

This post is derived from an email I sent to the NetBeans mailing last month. Some of the implementation details refer to specific items in the NetBeans codebase, but the general algorithms apply to any number of applications.

In the past I alluded to spending a great deal of time thinking about ways to improve the performance and usefulness of a code completion feature. This algorithm is complicated but ends up producing consistent, predictable behavior. It truly excels with COMPLETION_AUTO_POPUP_DELAY set to 0 and low-latency implementations of AsyncCompletionTask.query, but still performs better than alternatives when latencies are observable.

To start with, a couple definitions from the subject line:

  1. Filtering algorithm: the algorithm used after semantic context evaluation to restrict the identifiers actually displayed in the completion dropdown.
  2. Selection algorithm: the algorithm used to select an initial ā€œbest matchā€ item within the completion dropdown.
  3. Replacement algorithm: the algorithm used to determine what text gets replaced – currently chosen by the user pressing Enter or Ctrl+Enter.

I noticed that Ctrl+Enter deletes the current identifier before calling CompletionItem.defaultAction. Iā€™ll refer to the behavior of Ctrl+Enter as Extend because it extends the completion to the end of the current identifier. Iā€™ll refer to the behavior of Enter as No-Extend.

For this post, Iā€™m examining the following questions:

  1. Why is there a difference between Enter and Ctrl+Enter?
  2. When would you want the behavior of Enter, and when would you want the behavior of Ctrl+Enter?
  3. How should the completion dropdown get filtered?
  4. How should the ā€œbest matchā€ be determined?

Part 0: Progress

As part of my continued work on ANTLRWorks 2, I have modified the Editor Code Completion module to support everything described in this email without any breaking API changes relative to the current specification 1.28. In addition to preserving API compatibility, my current implementation exactly follows the existing code completion behavior if a developer does not explicitly override it. The changes are available with patches (unfortunately multiple patches as I tweaked a few things) as an RFE in Bug 204867 in the NetBeans Bugzilla.

Part 1: My answer to #1 (why is there a difference between Enter and Ctrl+Enter)

The difference is present because the current algorithm cannot reliably answer question #2.

Part 2: My answer to #2 (when do you want Extend vs. No-Extend?)

From what I can tell, the code completion algorithm uses this feature to compensate for not keeping track of information available when the completion was invoked. For example, suppose you are trying to complete the identifier getStuff, and the following currently present. For reference, assume this is columns 0 before the ā€˜gā€™ through 5 after the ā€˜tā€™.

getSt

When code completion (Ctrl+Space) is invoked at positions p=0 or p=5, the user expects the behavior of Enter. When the code completion is invoked at positions 0<p<5, the user expects the behavior of Ctrl+Enter. Also note that at position p=5, the algorithms of Enter and Ctrl+Enter are equivalent.

Part 3: Code completion selection in Extend mode

Using the example from Part 2, itā€™s clear that the current selection algorithm used in the completion dropdown does not properly handle the Extend behavior, because it only considers the text before the caret when selecting an item. When the completion algorithm in invoked in Extend mode, all of the text of the current identifier should be considered when choosing the default selection.

Part 4: Code completion filtering in both Extend and No-Extend modes

If the code selection algorithm of Part 3 is implemented, then the user will encounter major problems under the current filtering algorithm. In addition, it should be immediately apparent that the current filtering algorithm is crippled because it is fully incapable of handling even the simplest misspellings when completion is invoked at the end of an identifier (position p=5 in the previous example). While I do not believe the following rules are ideal for all situations, I designed them to be easily implemented and feel similar to the current rules while preserving the ability to support the selection mode of Part 3 as well as handling many misspelling cases.

  1. For prefix filtering using the prefix text in span [0,x) with the caret at position c, you should always have x<=c.
  2. If filtering on the prefix [0,x+1), where x>=0, produces an empty result, then filtering should be on [0,x) instead.

Part 4.1

In No-Extend mode with no misspellings before the caret, these rules produce exactly the same result as the current implementation. In No-Extend mode with misspellings present before the caret, these rules prevent having an empty (useless) dropdown appear. Unfortunately, if the user attempting to complete getShell types getSt and presses Ctrl+Enter, the filtering above would result in only showing getStuff. The solution is adding the following rule which has much larger ramifications.

  1. The completion list should not be filtered before the user types a character after the list is initially shown. When the dropdown appears in response to an automatic trigger (see CompletionProvider.getAutoQueryTypes), the list should not be initially filtered even if the trigger is a word character. The latter case occurs when options like ā€œAuto Popup on Typing Any Java Identifier Partā€ are enabled.

Part 4.2

To allow even more convenient typing, the filtering algorithm can be updated to also allow the following.

  1. Substring match: when filtering on a prefix span [0,x), with x>1 (at least 2 characters), the filter allows items containing the substring [0,x). The match may or may not be case-sensitive.
  2. Word boundary match: when filtering on a prefix span [0,x) which matches the regular expression ([A-Z]\w*){2,}, we call each group ([A-Z]\w*) a word prefix. The filter allows items containing words in the same relative order that match the word prefix. Note that this means the prefix UnsExc will allow UnsupportedOperationException even though the word Operation appears between the words matched by Uns and Exc. When evaluating the match, the ā€œwordsā€ of a completion item start when [A-Z] follows ^ or [^A-Z], and when [A-Za-z] follows ^ or [^A-Za-z]. The latter covers multi_word_ids_with_underscores. This match may or may not be case-sensitive, but in case-sensitive mode it only works for UpperPascalCase identifiers.

Part 5: Instant substitution with Part 4.1 in place

Currently instant substitution only operates if the filtered list has a single item in it. It also only works if the caret is located at the end of an identifier, and when the prefix is a case-sensitive match. The current algorithm is in CompletionImpl.requestShowCompletionPane. This algorithm would need to be updated as follows.

  1. The evaluated prefix for instant completion is the span [0,a), where Extend mode chooses the current identifier block and No-Extend mode chooses MIN(caretPosition, endOfIdentifier).
  2. The evaluated prefix must match the prefix of exactly 1 item in the completion list (unique match constraint). The match may or may not be case-sensitive (this is an option in the Java editor, and some languages donā€™t consider case at all). Note that only prefix matching is used, even if the filtering algorithm implements the advanced filters in Part 4.2.

Part 6: Initial selection with new filtering rules in place

It should be clear that if the filtering rules are relaxed per the advanced rules in Part 4 (especially Part 4.1), the current selection algorithm of first prefix match will do a poor job of choosing items the user is trying to complete. The following selection rules are prioritized for ideal behavior, but an implementation may use variations for efficiency as long as the variations result in predictable behavior (typically restricted to performance related simplifications to rules 1 and 9).

Unless otherwise specified, character matches are case-insensitive. While the user has an option to explicitly disable case-insensitive matching, if all of the rules from this email are in place then that option will negatively impact code completion usefulness.

  1. Evaluated span: Due to the relaxation of filtering rules in Part 4, the completion dropdown may include items even when the current identifier block does not match any item. The largest possible span is the same as the one defined in Part 5.1. A match which includes more characters from this span wins over one that includes fewer.
  2. Exact match (case-sensitive): When possible, choose a completion item whose text exactly matches the evaluated span text.
  3. Prefix match (case-sensitive): When possible, choose a completion item that starts with the evaluated span text.
  4. Exact match (case-insensitive)
  5. Prefix match (case-insensitive)
  6. Substring match: When possible, choose a completion item that contains the evaluated span as a substring (filtering rule 4.4).
  7. Word boundary match: When possible, choose a completion item that matches the evaluated span as described in filtering rule 4.5.
  8. Validity match: When possible, choose a ā€œsmart matchā€ completion item (sort priority < 0).
  9. Recently used: When possible, choose a completion item which was successfully inserted by a more recent completion than one inserted by an earlier completion (or not previously inserted).
  10. Case sensitivity: When possible, choose a completion item that matches the case of every matched character from the evaluated span. This decision is Boolean ā€“ the match is either all characters or does not match.
  11. Alphabetical order: If evaluation of all of the above still results in multiple potential ā€œbest matchā€ items, choose the first one in alphabetical order.

Part 6.1: Additional notes about language semantics in Validity and Recently Used selections

If semantics are tracked as well as the actual inserted text (e.g. for Java an MRU list of ElementHandle instead of String), then a weighting algorithm should be used to balance between text inserted more recently and having a full semantic match. One possible way to handle this is having one MRU that tracks semantic elements and one that tracks strings. In the semantic element list make sure there are never 2 items present which are valid within the same context, then always prefer a semantic match over a plain string match. The net impact of considering semantics is very cool, but hard to explain the nuances (the end user will just see it as the algorithm always knowing what to type).

In theory, a weighting algorithm could also be used to provide a hybrid of the Validity and Recently Used selection steps. At this point I have not considered the specifics of such a feature.

Part 6.2: Commentary about Visual Studio 2010

The C# language service Visual Studio 2010 implements several items described in this post. For users with access to Visual Studio 2010 with a C# project, the following is a list of some of the differences between it and the algorithms above.

  1. Word boundary matching (Part 4.2) is limited to the first character of each word. For example, the user can type NIE to match NotImplementedException, but NImExc will not work. In addition, words start when [A-Z] follows [A-Z], which significantly reduces accuracy when UPPER_CASE_NAMES are used (every letter counts as a new word). This is especially problematic when working with COM interop, including much of the Visual Studio SDK.
  2. When selecting a completion item, Visual Studio only considers Recently Used items when an Exact, Prefix, or Substring match occurs. For Word Boundary matches, it is ignored. When using System;, typing NSE will always match MulticastNotSupportedException no matter how many times you manually select NotSupportedException from the result.
  3. Visual Studio does not implement the Validity match step. My early experience with this feature led me to a conclusion that it was ā€œcoolā€ but generally problematic. After much consideration, I finally realized that including it as step 8 in the selection algorithm allows the user to benefit from its advantages without having it override the various character matching steps.

Visual Studio 11 apparently includes an additional fuzzy logic selection feature, which Iā€™m really hoping they properly inserted between the Word Boundary and Validity steps of the selection algorithm (fingers crossed).

25 Jan

Creating a WPF Tool Window for Visual Studio 2010

Iā€™ve been working on Visual Studio 2010 extensibility for some time now, and I must say that creating a tool window was not the easiest task in the world.

First Attempt: Create an MEF-friendly IToolWindowService

The original goal of this project was creating an MEF service that allowed exporting classes implementing IToolWindowProvider, and have the service manage the creation of the tool windows and their entries on the View > Other Windows menu. This worked, but had several drawbacks that eventually led to the conclusion that this was the wrong approach. First and foremost, this method forced the assemblies providing tool windows to load even when the tool windows werenā€™t visible. The performance implications of this rule out using MEF as a general solution to this problem. That said, here are some other ā€œlittle thingsā€ that I didnā€™t have worked out in the MEF solution:

  • Tool windows would not save their visible state; they were always hidden the next time Visual Studio was opened.
  • The menu commands to show the tool windows were not available until a source file of {insert some hard-coded type} was opened. This is because the service loaded itself by exporting IVsTextViewCreationListener. When I tried to use the ā€œanyā€ content type, I found that the service would cause an InvalidOperationException when the environment loaded because the tool windows were created while the environment was using an IEnumerator to traverse the current windows.

Overview of the Improved Process

Here is an outline of the general process of creating a new tool window. Following the outline, Iā€™ll explain in detail what each step requires.

  • Create a VSIX project
  • Configure the project to offer a VSPackage and a command table
  • Create the WPF control your tool window will be displaying
  • Include my helper class WpfToolWindowPane in your project
  • Derive a class from WpfToolWindowPane for your tool window
  • Set up menu commands

Create a VSIX project

Iā€™m basing this off of the VSIX project, because itā€™s a nice clean project template. Itā€™s also beneficial because users that already have a VSIX project can easily add a tool window to it.

  1. Create a project using the ā€œVSIX Projectā€ template (Visual C# > Extensibility). Choose a different solution name than project name or youā€™ll run into issues later.
  2. Delete the file VSIXProject.cs.
  3. Right click the file ā€œsource.extension.manifestā€ and select View Code. Update the Name, Author, and Description fields with information about your extension. Save and close the file.
  4. Right click the project in Solution Explorer and select Unload Project. Then right click it again and select ā€œEdit MyProject.csprojā€
  5. Locate the line that says <IncludeAssemblyInVSIXContainer>false</IncludeAssemblyInVSIXContainer> and change the value to true. Save and close the file.
  6. Right click the project in Solution Explorer and select Reload Project. If Visual Studio gives an error about a project with the same name already being open, restart Visual Studio and try again.

Configure the project to offer a VSPackage and a command table

  1. Add an XML file to the project named ā€œMyProject.vsctā€. In the properties pane for it, change the Build Action to VSCTCompile.
  2. Add a resources file to the project named ā€œVSPackage.resxā€ (use exactly that name). Open the file in the resources editor, and at the top set the Access Modifier to No code generation. Save and close the file.
  3. Unload the project again and open it for editing.
  4. Set GeneratePkgDefFile to true.
  5. Below the line with GeneratePkgDefFile, add <RegisterWithCodebase>true</RegisterWithCodebase>.
  6. Set CopyBuildOutputToOutputDirectory to true.
  7. Locate the line containing <VSCTCompile Include="MyProject.vsct"/> and change it to <VSCTCompile Include="MyProject.vsct"><ResourceName>1000</ResourceName><SubType>Designer</SubType></VSCTCompile> .
  8. Find the line containing <EmbeddedResource Include="VSPackage.resx">, and add both <MergeWithCTO>true</MergeWithCTO> and <LogicalName>VSPackage.resources</LogicalName> as children.
  9. Save, close, and reload the project file.
  10. Add a new class to the project named MyProjectPackage. Derive the class from Microsoft.VisualStudio.Shell.Package. Set the class GUID by adding the attribute [Guid("00000000-0000-0000-0000-000000000000")] (use the Create GUID tool to create the actual value youā€™ll use here). Add the attribute [PackageRegistration(UseManagedResourcesOnly = true)] to tell Visual Studio to register the class as a VSPackage. Provide the command table (vsct) by adding the attribute [ProvideMenuResource(1000, 1)].

Create the WPF control your tool window will be displaying

For this part, you can create any control derived directly or indirectly from System.Windows.Control.

Include the helper class WpfToolWindowPane in your project

This helper class handles most of the code required for providing a tool window. You can download WpfToolWindowPane.cs here.

Derive a class from WpfToolWindowPane for your tool window

  1. Add a new class named ToolNameToolWindowPane to your project and derive it from WpfToolWindowPane. Use the Create GUID tool to create a guid for ToolNameToolWindowPane, and add a GuidAttribute to it.
  2. In the constructor, set the Caption of your tool window with base.Caption = "Tool Window Name"; .
  3. Override the CreateToolWindowControl() method to return a new instance of the control you created earlier. The method can be as simple as return new ToolNameControl(base.GlobalServiceProvider); .

Set up menu commands

The last step is adding a command to the View > Other Windows menu so your tool window can be opened.

Setting up the command table

Open the MyProject.vsct file and fill it with the following. Use the same Guid for guidMyProjectPackage as you used for the MyProjectPackage class. For the other two placeholders, create new Guids.

< ?xml version="1.0" encoding="utf-8" ?>
<commandtable xmlns="http://schemas.microsoft.com/VisualStudio/2005-10-18/CommandTable">
  <extern href="vsshlids.h"/>
  <commands package="guidMyProjectPackage">
    <buttons>
      <button guid="guidMyProjectPackageCmdSet" id="cmdidShowToolName" priority="0x100" type="Button">
        <!--<Icon guid="guidShowToolNameCmdBmp" id="bmpShowToolName"/>-->
        <strings>
          <buttontext>Tool Name</buttontext>
        </strings>
      </button>
    </buttons>
 
    <!--<Bitmaps>
      <bitmap guid="guidShowToolNameCmdBmp" href="Resources\ToolIcon.png" usedList="bmpShowToolName"/>
    -->
  </commands>
 
  <commandplacements>
    <commandplacement guid="guidMyProjectPackageCmdSet" id="cmdidShowToolName" priority="0x100">
      <parent guid="guidSHLMainMenu" id="IDG_VS_WNDO_OTRWNDWS1" />
    </commandplacement>
  </commandplacements>
 
  <symbols>
    <guidsymbol name="guidMyProjectPackage" value="{00000000-0000-0000-0000-000000000000}" />
 
    <guidsymbol name="guidMyProjectPackageCmdSet" value="{00000000-0000-0000-0000-000000000000}">
      <idsymbol name="cmdidShowToolName" value="0x2001" />
    </guidsymbol>
 
    <!--<GuidSymbol name="guidShowToolNameCmdBmp" value="{00000000-0000-0000-0000-000000000000}">
      <idsymbol name="bmpShowToolName" value="1" />
    -->
  </symbols>
</commandtable>

Add a Constants class to your project

Add a class named Constants to your project to make the Guids you used in the command table accessible to your code.

internal static class Constants
{
  public const int ToolWindowCommandId = 0x2001;
  public const string MyProjectPackageCmdSet = "{00000000-0000-0000-0000-000000000000}";
  public static readonly Guid GuidMyProjectPackageCmdSet = new Guid(MyProjectPackageCmdSet);
}

Handling the menu command

Open the MyProjectPackage class. Add a new attribute to provide your tool window: [ProvideToolWindow(typeof(ToolNameToolWindowPane))]. Add the following code to the body of the class:

protected override void Initialize()
{
  base.Initialize();
  WpfToolWindowPane.ProvideToolWindowCommand<ToolNameToolWindowPane>(this, Constants.GuidMyProjectPackageCmdSet, Constants.ToolWindowCommandId);
}
22 Jan

Commentary on Parsing Languages for IDEs

I originally sent this to the ANTLR interest group, but figured it would make for a decent post here as well.

I’ll start with a couple fundamental concepts. First, there are three key things that get parsed in an IDE:

  1. The syntax highlighter lexes the current document.
  2. Files that are not opened in the editor.
  3. Files that are open (for editing) in the editor.

Second, the very nature of writing code results in semantically incorrect (invalid) code *almost always*, and syntactically incorrect code most of the time. Very often, the code is in a state that it can’t even be lexed by the language’s lexer. It is critical for each of the above cases to absolutely minimize the impact on the ability to provide meaningful coding assistance. This point is the fundamental reason I believe incremental lexers and parsers are significantly less valuable to an IDE than is often believed.

Here are several things to remember about each of the three "parsables".

Syntax Highlighting

Syntax highlighting is the only item above that requires a real-time component. The syntax highlighter must be able to perform a standard view update in less than 20ms for any character input. The easiest way to accomplish this is writing a "lightweight" lexer that, given any input that starts at a token boundary can tokenize the remaining text. The backing engine for my current syntax highlighters maintains a list of lines that do not start with a token boundary – for many languages this occurs for the 2nd and following lines of a multi-line comment. I can start lexing at any line in the entire document as long as it isn’t contained in this list, and can stop under a similar condition (the stop condition is slightly more complicated so I’ll leave it out). *The primary syntax highlighter must not perform any form of semantic analysis of the result.* A secondary highlighting component can asynchronously add highlighting to semantic elements such as semantic definitions, references, or other names.

Here are some basic things I do to improve the performance of the syntax highlighter’s lexer:

  1. Do not lex language keywords that look like an identifier. Instead, when I assign colors to tokens I check if the identifier is in a hashtable of language keywords.
  2. Do not restrict escape sequences in strings literals to be valid. The only escape to handle is \" to not close the string. If strings cannot span multiple lines in your language, then treat an unclosed string literal as ending at the end of the current line.
  3. If character literals start and end with, say, an apostrophe (‘) and no other literal in the language uses an apostrophe, then treat character literals like you treat strings (allow any number of characters inside them, and make sure to stop the token at the end of a line if it’s missing a closing apostrophe.
  4. Make sure the lexer is strictly LL(1).
  5. Include the following rule at the end of the grammar: ANY_CHAR : . {Skip();};

Unopened Files In The Project

For any block of language code that does not affect other open documents (such as the body of functions in C), don’t validate the contents of a block. For C, this could mean parsing the body of a method as:

body:block
block:'{' (~('{'|'}') | block)* '}';

Often, all you care about are the declarations and definition headers. This sort of "loose" parsing prevents most syntax errors in the body of methods from impacting the availability of the key information – references to the declarations are usable at other points in code. Further improvements can be made by forcing a block termination when a keyword is found that cannot appear in the block, but since this can cause some unexpected results and offers relatively low "bang for the buck", I recommend holding off on this approach.

Files Open For Editing

One of the most difficult aspects of an "intelligent" IDE is how to handle files while they are being edited. In designing an appropriate attack on the problem, it’s important to identify the types of information you can gather and for each: 1) Categorize it, 2) Give it a difficulty rating, 3) What can you do with it, and 4) Prioritize it. I’ll give several examples along with how you might leverage each to improve the overall usefulness of the IDE. Note that all of the below are performed asynchronously using a parameterized deferred action strategy described in a section below.

Information: Invalid literals (strings, numbers, or characters)

  • Category: Lexical errors
  • Difficulty: Given access to the tokens in the current document, very easy. Incremental by nature due to intentionally implementing it using the syntax highlighter’s lexer and strategy.
  • Action: Underline the token or part of a token that is invalid.
  • Priority: Useful information that is easy and computationally inexpensive to maintain. This might be implemented at a very early stage when, say, learning how to asynchronously "mark" text after it has been highlighted (information that is helpful for a number of more difficult features later).

Information: Language element blocks (perhaps method and field declarations, but not locals).

  • Category: Editor navigation
  • Difficulty: Easy to "first-pass" it by running the unopened files parser. For a high-quality product, you’ll use a different strategy that I’ll describe under the Advanced Strategies section below.
  • Action: Populate the "type and member dropdown bars" and the top of the editor, update a pane that shows a structural outline of the current file, and mark large blocks (say full methods) as collapsible.
  • Priority: This is a fundamental and relatively easy feature that should be implemented in some form soon after syntax highlighting is in place.

Information: Argument type mismatch

  • Category: Language compile-time semantics
  • Difficulty: Requires full type information for the target method and semantic details of the expression(s) passed as arguments. If you just use the language’s compiler for this information, the information will only be available when the compiler can get far enough to observe the problem. If you don’t have access to the compiler’s code, you might also be unable to turn off several compiler features that slow down the operation significantly.
  • Action: Underline the parameter(s) or the call with a tooltip or other description of the problem.
  • Priority: While quite useful in a statically-typed language, this is an extremely difficult feature to fully implement and is therefore relatively low on the priority list.

Auto-completion

I decided to address this separately from the above. Here are the governing factors an auto-complete feature:

  1. It must be fast (sub-50ms *latency*) – the user is actively waiting for the results.
  2. The document is never syntactically correct when this feature is used.

Core strategy: This is not complete, but gives a general idea of the initial approach that gives quite tolerable results.

Start at the cursor and read tokens in reverse "until they no longer affect the current location". For c-like languages, this means reading identifiers, periods, arrows (->), and parenthesis with arbitrary contents and nesting.

The result can generally be parsed as a postfix expression; the parser should be able to built an AST for just that postfix expression without any additional context.

Evaluate the AST against its previously cached context – use the buffer-mapped span of the enclosing language elements to evaluate the visibility of elements as you manually walk the expression’s AST. At each step, generate a list of visible elements, and select the appropriate item before continuing. At the end, you’ll have a list of accessible items at the point auto-complete was triggered – match that against any text the user has already typed and either fill in the single result or present a dropdown.

Advanced Parsing

(only one example here so far)

Robust and fast language element identification in the presence of errors:

Due to the way the unopened file parser skips parsing function bodies, it tends to be extremely fast. When it fails to parse a document, due to say a syntactically incorrect field declaration, you don’t want your opened files to stop showing navigation information. Upon failure, the opened file strategy can fall back to using an ANTLR fragment parser to locate the headers of language elements (class, field, or function definitions), from that information you can infer the scope of each element, and generally identify most or all of the items declared in a document.

After identifying elements by name and their "span" in the document, you’ll want to keep a list of the information around in case future edits render both of the above parsing methods unusable. When the header portion of a language element is deleted as part of a document edit, the element can be immediately removed from the cached list of elements located in the current file. Further, if the previous element had an inferred termination due to mismatched braces, its span can immediately be expanded to include any remaining portion of the original span of the removed language element. The cache relies on [buffer span mapping] to properly track the current location of each language element as edits are applied to the document.

Any time the IDE tries to offer information about a language element in an opened file, the information is checked against that documents cache for potential updates (for example, Go To Definition should always go to the correct location, even if a large block of text was pasted above the definition).

Deferrable Action Strategy

This strategy is basically a modified, asynchronous "dirty" flag based trigger for an arbitrary action. The strategy addresses several goals:

  1. Since the operation is not "free", you don’t want to repeat it too many times.
  2. Since the operation takes more time than the actions that necessitate the action (typing keystrokes takes less time than a re-parse), you want to A) run the action on a different thread and B) try to avoid running the action on old data.

Here’s the basic implementation:

  1. When the action’s target is initially marked dirty, a timer is set so the clean-up action will run on a separate thread after some period of time.
  2. When some operation occurs that *would* mark the target dirty, except the target is already dirty, the timer is deferred – reset to occur at a later time.
  3. Decide on a "cancellation policy":
    • When the action runs, does it mark the target clean for the state before running or the state after running? If it marks the target clean *after* running, then you can simply ignore a request to mark it dirty while running (this is the rare case though).
    • Are the results useful if the target is marked dirty after the action starts but before it finishes? If not, you want to cancel any currently running operation and go back to step 1 (or 2). If so, keep going and go to step 1 after it completes and mark the target dirty (and reset the timer). Normally this is a gray area – the results are partially useful so the decision is balanced in some manner between the speed of the operation, the rate at which things are marking the target dirty, and the usefulness of "stale" results (results that are available only after the target was marked dirty again).
17 Jan

Root Folders v. Window 7 Support

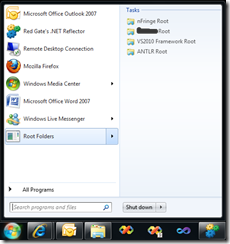
With the addition of Jump Lists to the taskbar in Windows 7, I couldnā€™t pass up creating a new root folders solution to leverage this organization on the Start Menu. By combining WPF and .NET 4ā€™s new Windows Shell APIs, the result was remarkably simple. Iā€™ve included the source code in the archive below if you want to see the details.

To use the application:

  1. Download the RootFolders7.zip (22kB) archive and extract the contents to some location (C:\Program Files\RootFolders perhaps?)
  2. Right click RootFolders.exe and select ā€œPin to Start Menuā€.
  3. On the start menu, you can hold shift and right click the shortcut to rename it to ā€œRoot Foldersā€ (adding a space).
  4. Run the application to configure your root folder targets, then select File > Save Changes.

Here is the configuration application and the result:

Configuration

Presentation

25 Nov

MEF support for the Output Window in Visual Studio 2010

As some people have noticed, the Visual Studio 2010 SDK doesn’t have great support for the Output Window from MEF extensions. This post aims to change that. Like several other components I’m writing about, I hope to provide this one in a “general extensibility helper” that could be installed separately from extensions that use it so its features can be shared among them.

There are a couple goals here:

  • Provide a service for accessing the output window panes
  • Provide a simple method of creating new output window panes

I’ll start with the usage (since that’s the interface people will normally see) and follow it with the implementation.

Defining an output window pane

Now this is easy.

Using an output window

First you import the IOutputWindowService:

Then you use it to get an output window, which you can write to:

If you want to write to one of the standard panes, pass one of the following to TryGetPane:

The IOutputWindowPane and IOutputWindowService interfaces

The internal implementation

Finally, one extension method that’s used to help with the IOleServiceProvider

© 2024 Sam's Blog | Entries (RSS) and Comments (RSS)

Your Index Web Directorywordpress logo